Monday, 28 June 2010

Bird Brained

This month Lynne at the Altered Element sent a stamping surfaces pack. Included in it were these cute little bird stamps...


... and loads of different things to stamp on including grunge board, canvases, stamp board, shrink plastic, metal, Tyvek and fusible film.

Now I don't know if it is the hot weather or an overdose of Springwatch but I've been totally bird brained this month. The first thing I did on receiving all these goodies - including lime green fusible film - was to paint a sheet of felt with Lumiere paint in purple and add even more sparkle with mica sprays. I seem to be having a very purple and sparkly phase at the moment. If it isn't the heat maybe its my age?

Anyway I do like bright colours and I'd been knitting with some copper wire from last months pack - just to see if I could really - which resulted in a messy net that just needed a purple background. (For neat, beaded wire knitting with proper shape check out Beth's blog.)

Then, with the bird stamps and thoughts of netting birds to ring them in mind - Springwatch on the brain - I set about using as many bird stamps as possible on as many of the surfaces supplied as possible. Despite my best efforts I haven't managed to incorporate them all. I really ought to plan a bit more but the novelty of experimenting with things gets the better of me, often. So I made lots of patches and charms featuring birds which I incorporated into a sort of wall hanging.
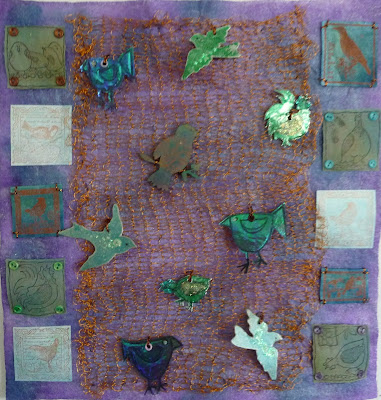
The patches down each side are made in three ways.

One set are stamped with Brilliance Ink onto Tyvek sprayed first with mica spray. The squares I used weren't heat treated. Maybe I'll post the "bloopers" that resulted from heating it later -enough said!

Another were stamped on tea dyed fabric to which I added extra colour and bling with mica spray. The stamping was with StaZon.

The third set were stamped onto shrink plastic which had been painted with watered down Lumiere paint. When shrunk this has a wonderful deep colour and interesting texture.


The charms were also created in a variety of ways too. I painted a sheet of grungeboard with the pearlescent Eco Green acrylic paint from last months pack. Once dry I stamped with StaZon and cut out the birds.
Another set were stamped onto fusible film using a Karantha unmounted stamp. More bloopers here before I got the ironing right and fused the layers on the stamping without frazzling the lot.
I coloured metal with Alcohol Inks and stamped with Brilliance ink. I stuck the metal to card to reduce kinking and cut out the chickens.
I also used a laser cut bird shape - like a Twidleybitz but from old stash - painted with Lumiere paint and overstamped with Brilliance.

You can see in the close up shots that the film shapes had holes reinforced with eyelets and all the charms are fastened to the wire net with loops of thread.
I also made ten inchies for a swap, again based on painted felt. The flowers are die cut from shrink plastic, stamped with random patterns before shrinking.


The flowers can be shaped before they cool and I fastened them with stitches and beads in the centre.


Thursday, 17 June 2010

Football Widow?

Calling all football widows....

Whilst the football mad are safely parked in front of the telly get out your credit cards and head for The Altered Element on-line shop. They have a 10% off offer (try saying that after a lager or two) running during each of England's world cup matches so on your marks ready to shop tomorrow evening.

Go to their blog before kick off to pick up a discount coupon code and place your order whilst the match is underway.

Sunday, 6 June 2010

More DT challenge news - May and June combined

Part of my May DT challenge pack from the Altered Element was a Twiddleybitz Bird Cage kit.


Initially I coloured the pieces using Moonshadow Mists which are walnut ink sprays with coloured mica. I'd intended the cage to look shimmery and brown to go with the other items in last month's pack but somehow despite spraying several colours the result had a distinctly pink tinge to it which led me off down another, brighter route.


I covered the roof with some of the metal sheet provided in the June stamping surfaces pack. I embossed the pattern of tiles into it with a paper stump before gluing it down and then added colour with Wild Plum alcohol ink and more Moonshadow Mist.

I used another bamboo skewer from the kitchen drawer to make a perch. I wiped this over with brown paint to darken it and fastened it with little twists of bright pink wire.


I coloured some German scrap border with Wild Plum alcohol ink and Moonshadow mist to decorate the edge of the roof. The bead on top is fastened with a head pin and some Diamond Glaze.
The base is decorated with coordinating flowers. I must have a thing for pink and purple because I happened to already have these but often I buy white and paint, ink or spritz to match a project.


All it needs now are five feet of some description.


My June upcycle challenge item was this bracelet......


...... which I have cleaned and dismantled and two pieces of it are now phone/bag charms. (Don't tell anybody but I had planned earrings until I found out how heavy I had made them. I've still got three links left though so perhaps with better planning at the start I might yet make a wearable pair.)


I risked fingers and eyes to remove the very dark plastic gems from the bracelet with a craft knife, a lot of patience and a little bad language. I'd love to know what adhesive they used, I could certainly do with some!


The empty holes are filled with beads and wire from last month's DT pack sealed in with Diamond Glaze.

Wednesday, 2 June 2010

Just like buses....

Nothing for ages and then three come along at once!

In my DT pack for May there was a length of the most beautiful beaded ribbon in a turquoise and coppery gold colour scheme.

Taking the colours as my starting point I painted some calico with turquoise, copper and yellow/green fabric paints in broad stripes using a lot of water to blend on the fabric - no skill or technique here, just use a flat brush and slap it on. Once dry I over stamped, again with paints, using bubble wrap and a swirly back ground stamp and then sponged through some sequin waste for a bit more pattern. I can do less is more but it doesn't happen often!


I used Simplicity pattern 9949 to cut pieces of my painted fabric to make a small bag. I sewed lengths of the beaded ribbon along each end of the main piece before assembling the bag. The important thing is to make sure the cut ends of the ribbon and the threads holding the beads are secured into the seam so they don't come undone.

Here's a close up of the beading.


I'm seriously thinking I need to get a longer length of ribbon to decorate a pair of flip flops.

May upcycle challenge, feels like cheating

Lynne at The Altered Element sent a huge and heavy parcel full of DT goodies for May, and here's the reason why....


The upcycle challenge item was this wooden jewellery box, and she also sent all these other goodies.
It is worth ordering from The Altered Element for the added delight of opening the beautifully wrapped parcels. Items are usually in individual brown paper bags taped down so you have to peel them open carefully, like at Christmas, to save the nice paper for later. There is lilac tissue in the box too to pad out any space. I'd put this on the side thinking I'd save it for a project but before inspiration struck the hamster beat me to it. He now has a pretty, cosy lilac nest.

After the fun of unwrapping and time spent stroking the goodies I started my upcycle project. I always find it a little difficult to get going when I have something that is in good condition to start with. It goes against some in-built instinct to make the first move and spoil the exisiting article. I have the same trouble with altering books and try to find tatty ones to make starting easier.

Once I'd taken it apart, removed the lid, legs and handles and sanded the external surfaces it became much easier. All scruffied up there was no going back. I used the Eco Green acrylic paint (over two textured coats of gesso) to start with. Lynne had sent me Green Patina which was very pearlised and pretty but wasn't quite what I had in mind. I was aiming for a distressed, worn finish that looked completely different from the polished box I started with, so I wiped over it with some Adirondak paint dabber which has a matte finish and took some of the shine away.

As well as changing the look of the box I decided it needed a new use - as a mini sewing box to hold enough things for an individual project at a time. I made a pin cushion top for the lid using printed canvas and layers of wadding. See my blog from last month for details of the Golden Mix More Media products for printing on canvas.


I took out the insides of the box to leave plain compartments and added a canvas and elastic holder inside the lid to cover the space where a mirror had been.

I used some Adirondak Metallic Mixative in pearl colour with a drop of lettuce alcohol ink to colour the handles before putting the box pack together without feet. I'm sure they'll be really useful for something else later.

Still feels like cheating to get a box and upcycle it into another box but it looks and feels quite different.

This must be a record

This must be a record for the least late I have so far been posting my 365 challenge page.

Going back to work after my convalescence was a bit of a shock to the system and I have been too tired to do much in the evenings for the past few weeks so I have to confess that there has been a degree of catch up required over the bank holiday weekend to get back on track.


The colour scheme for June reminds me of the sea side - a bit too early for summer holidays though.